So…have you recovered from Part 1 of my Picmonkey tutorial? No? Then grab a stronger drink, because we’re about to start the fun part of using this program!
Today, I’ll be showing you some of the effects you can create using Picmonkey. I’ll show you several styles, but there are many more to choose from, and the fun really begins when you start layering them. Yes, you can easily overdo it if you start stacking them too deeply, but sometimes you hit on a combination that is just magic! So don’t be afraid to experiment…that’s the real fun!
I’m going to continue working on the photo I started yesterday and pick up on the steps where I left off. I’ll show you how a specific effect looks, then cancel it and show you another one.
10. Effects – Orton – Standard setting. This effect gives your photo a soft, bloomy look. It seems to work better with lighter photos, so if you have a dark one you want to use it with, you can always go back to Basic Edits – Exposure and adjust the Highlights or Brightness. I don’t usually do this, but it’s always an option!
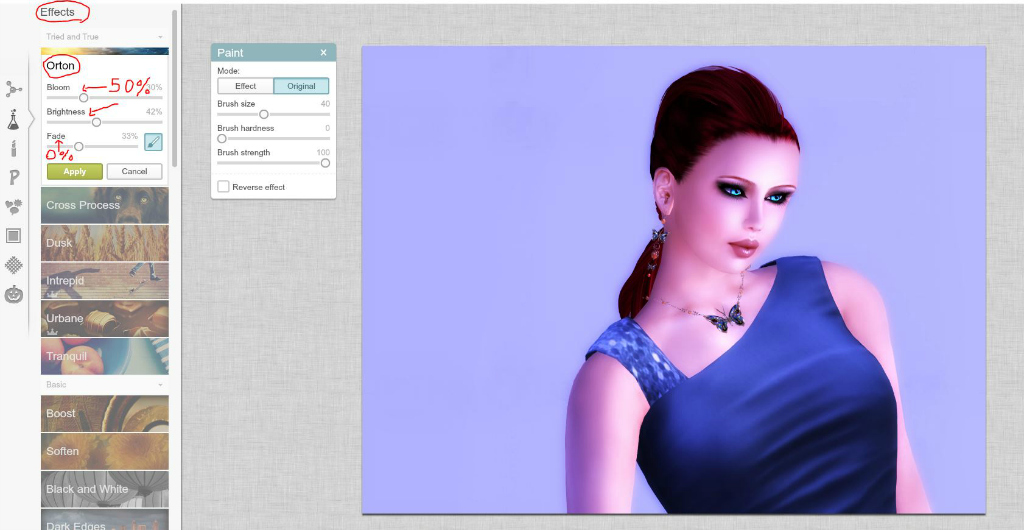
The standard levels for Orton are Bloom and Brightness at 50% and Fade at 0%. I decided it was a bit too much, so I played around with the sliders until I found a combination I liked. If you think there is too much effect in only a part of the photo, you can use the Eraser to remove it. Play around with the brush size and fade until you are happy with the way the effect is reduced. If you need to touch up just a small area where you went a bit far, switch from Original to Effect and paint the adjustment back in. You can do this with most effects, by the way 🙂
11. Effects – Intrepid – Standard setting. This gives a photo a cooler tone and bit of a halo effect.

I’m happy with the standard application of this effect, so I (personally) wouldn’t make any adjustments. I would just hit Apply.
12. Effects – Tranquil – Standard setting. This effect gives a soft, pink hue to your photo.

With lighter photos, this effect can make the image look washed out. You can always adjust the fade if you think it’s just a bit too much.
I thought it was too much, so I adjusted the fade from 0% to 50%.
13. Effects – Film Stock – Royale settings. There are three effects to choose from in this option – Velvia, Realia and Tri-X. These effects are to give your photos the look these film types give. Velvia and Realia are colour and Tri-X is black and white.
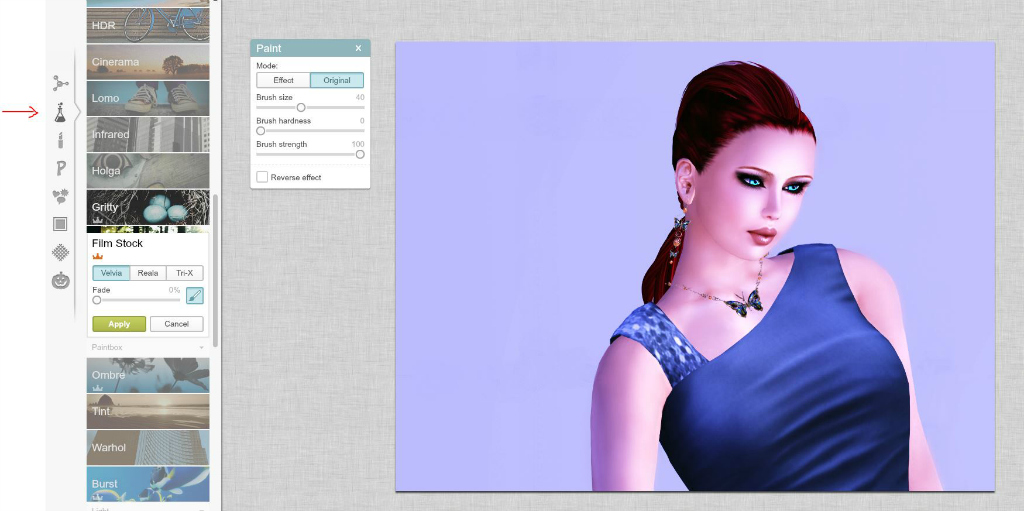
I’ve chosen to use Velvia. It gives the photo a more realistic look, without going too dark. Tri-X is a good option if you want a black and white photo, but you can also use the Black & White effect or even Tint, with adjustments if you are not a Royale user. You also have the option to adjust the hue with those effects, so I tend to use those more often than Tri-X.
I didn’t make any adjustments to the standard Velvia effect in this photo.
14. Effects – Bokeh – Standard setting. Do you like those little bubble effects in some photos? Bokeh is the way to do this!
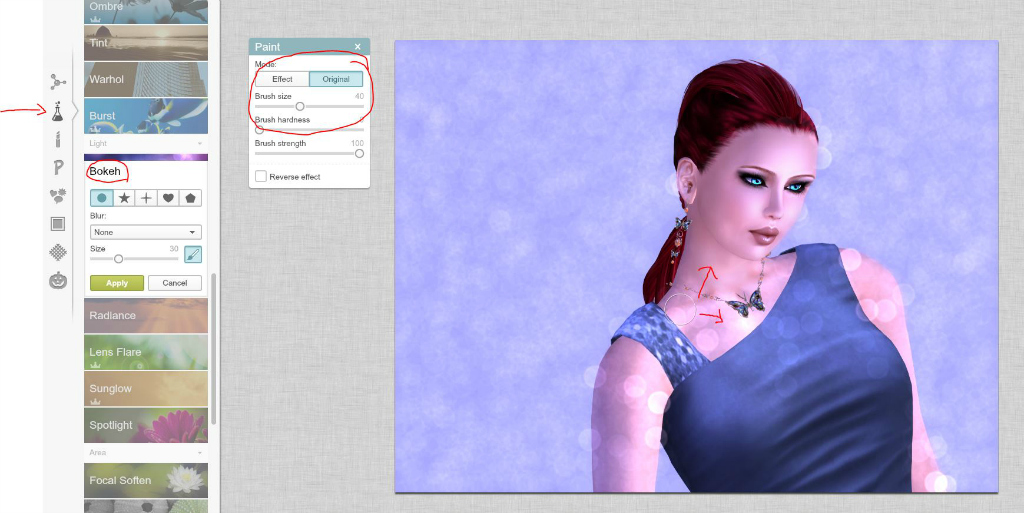
Bokeh is a fairly new entry to picmonkey. It adds varying amounts of bubbles to your photo. It is really dependent on how light your photo is on how strong the effect is. You can adjust the size of the bubbles and increase the glow, if you choose. In this photo, there were LOTS of bubbles, so I used the Eraser to remove them from my face and neck.
15. Effects – Sunglow – Royale setting. I totally love this effect. I have to remind myself not to overuse it!
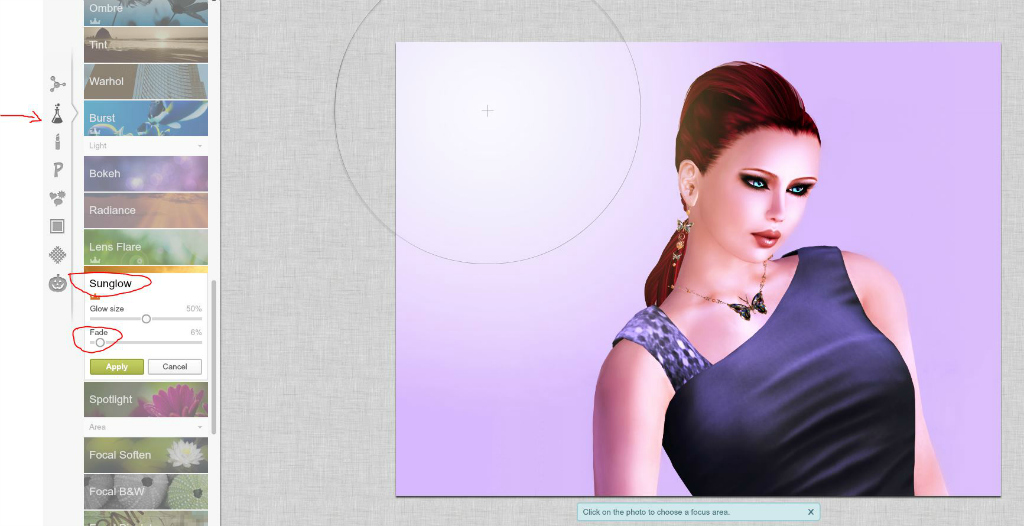
Sunglow does just that – it adds a glowing sun to your photo. You can place it wherever you want, adjust the size and the fade. It gives your picture a warmer tone. I think it works well with this photo, which is very cool. It just adds a bit of glowing warmth.
16. Effects – Curves – Royale setting. Curves gives you much greater control over the exposure of your photo by allowing you to make adjustments to the tones (RGB) in varying degrees. You can either use the pre-defined settings in the drop-down box, work across all tones (the RGB level), or work with reds, greens and blues individually. You can make minor or major adjustments to the highlights and brightness of your photo using this tool.

I’ve made adjustments in this shot on both the RGB and the individual colour levels, just to show you it can be done. This is another effect that is very powerful, but you will need to experiment with it. You can use it to adjust the tone or brightness after you’ve added an effect, or use it instead of the basic Exposure setting.
There are a lot more Effects to play with, but these are the ones I use most frequently. Now…on to Textures!
I want to quickly make note of something very important. In both Textures and Overlays, you can import your own textures to use. There are tons and tons of photos you can grab from the internet to add to your work. However, please make sure you always follow the restrictions placed by the creator. I love to use images from deviantART, but I always check the restrictions on use before downloading a photo. Most contributors there are very generous, requiring only a favourite, a credit and a link back in their comments. Remember, if you use someone else’s photo without following their rules for use, depending on the type of licensing they use, you could be breaking the law.
Just so there is no confusion about this, I’m choosing to use one of the standard textures provided by Picmonkey.
17. Textures – Burst – Standard setting. There are three choices of textures to use under Burst. I am using the third one, which has rays of stars bursting from the top of the photo.
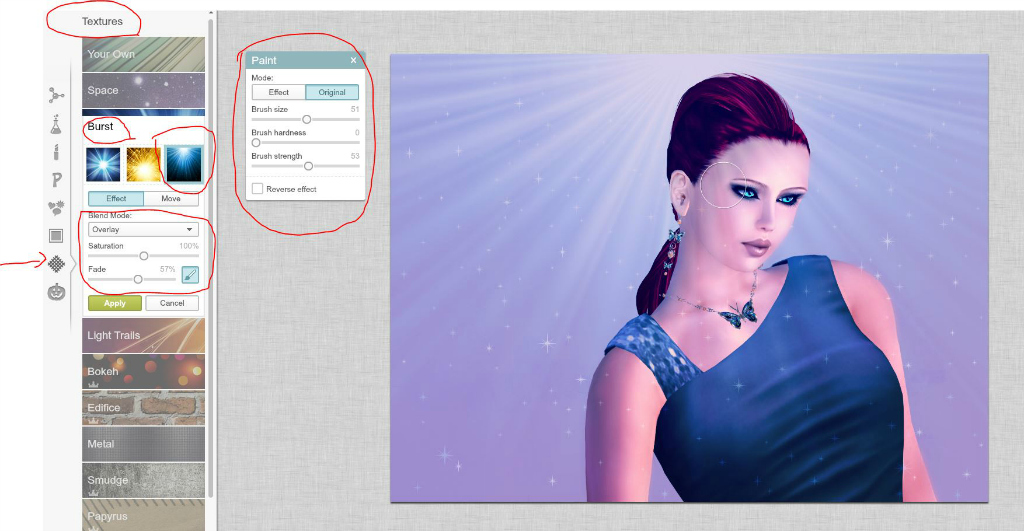
The default Blend Mode for this is Multiply. However, it seems too dark to me. I generally flip through all of the blend modes to find the one that works best. In this case, I’ve chosen Overlay. I’ve left the Saturation at 100% and adjusted the Fade from 20% to 57%. I go by the way the effect looks here – there is no magic number, just trial and error. But I don’t want the starburst to cover my face. By using the the Paint feature, I can erase it from my face and chest. I have reduced the Brush strength so the effect isn’t totally lost, and depending on what area I am working on, I will adjust the brush size. If you accidentally “colour outside the line”, just switch from Original to Effect, and paint it back in. When you’re happy with it, just click Apply.
I’ll leave it to you to experiment with the other Textures. Now, I’ll move on to Frames.
18. Frames – Daguerreotype – Royale setting. Want an old time look to your photo? Then you want to try out Daguerreotype!

Again, there are three different types of frames as well as three different Film effects – Brady, Shiro and Plumbe. In this case, I’ve chosen the first frame type and the Plumbe film effect. However, I decided I wanted some of the original colour to show through, so I adjusted the fade to bring it back in, while still maintaining the frame and most of the effect.
You can access Daguerreotype from the Effects menu, but it only applies the Film effect – not the frame.
19. Frames – Simple Edge – Standard setting. If you want to caption your photo, adding a Simple Edge is the easiest way to do it.
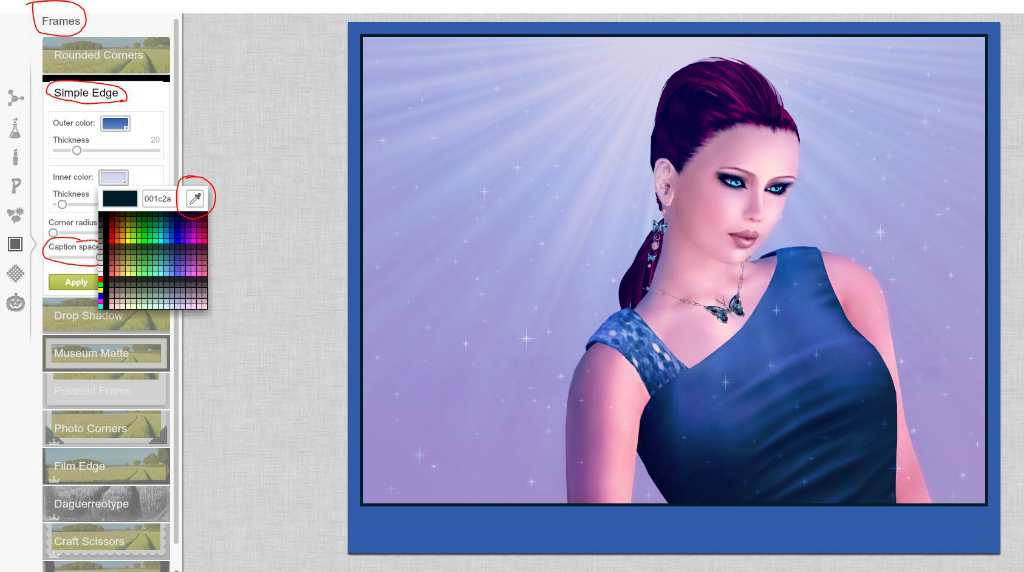
A simple edge frames your photo with a thick outer frame and a thin inner frame. To add a caption space, just increase the caption space thickness (kind of hidden in this photo). The default is a black outer frame with a white inner frame, but you can change these colours by clicking on the colour boxes. I usually use the Colour Picker to select colours that are found in the photo. To do this, just click your cursor on the eyedropper in the top corner of the colour picker, then hover it over any colour on the screen. Once you’ve found the colour you want, just right-click your mouse button, and it will set that colour.
But what’s a frame without a caption? On to Text!
20. Text – Standard & Royale settings.
You can have all kinds of fun adding text to a photo, or use it for product displays to add your product information. Or whatever strikes your fancy!
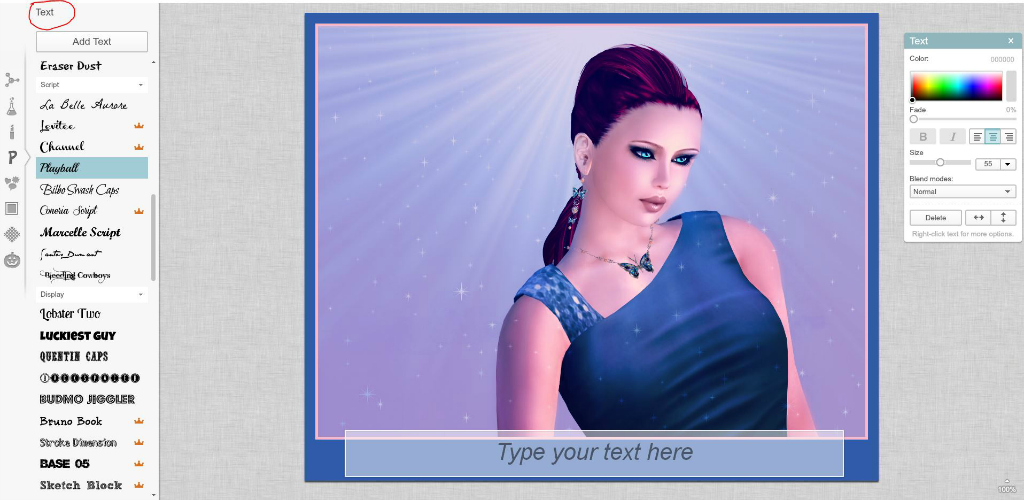
To add text, just click on the Add Text button. Clever, eh? The default font is Didact Gothic, but all you need to do to change the font is to click on one of the dozens that are included. Then just pop your cursor in the text box that pops up and start typing. You can change the size, the blend mode, the justification and the colour (including using the colour picker again) from the pop up window that controls text. You can use mulitple sizes and fonts by highlighting the part of the text you want to adjust. Once you have your text written, you can place it wherever you want, making adjustments to size by dragging the edges of the text frame. The combinations are practically endless!
When you’ve finished your photo, you may want to claim it as your own. Here’s where Picmonkey makes adding a watermark easy – through use of the Overlay function.
21. Overlay – Adding a watermark – Standard setting. While there are tons and tons of options with using the Overlay function, one of the nicest ones is to be able to add a watermark to your photos. I created my own watermark in Picmonkey by following the steps in this Picmonkey blog post. I’m not going to recreate the steps – please just click the link and follow along.

Once you have created your watermark (or if you have one already), just go to Overlay – Your Own to import your image. You can then adjust the placement, the blend mode and fade to suit.
And that’s about it. I haven’t covered even a fraction of the possibilities available using picmonkey, but I hope you’ve learned a bit about what it can do. With just some patience and some practice, you can turn a snapshot into a masterpiece…you’re only limited by your imagination!

(My final image is using all of the basic edits and touch ups, plus the burst texture, simple edge frame, text and adding my watermark using overlay)
I have completed a fourth tutorial using PicMonkey – this time it’s a video! You can click here to check it out.

very cool and informative! 😀
Hugs and thank you! It kept me out of trouble for a while, putting it together 😉
Hi Peep! The first time I visited your blog was your Picmonkey tutorial, and this sequel is certainly worth a “Follow”! Thanks for taking the time and effort to publish this, it really is a great resource for even a frequent picmonkey user like me – I learned a LOT! One of the coolest things about these posts is how you show the effects on one pic to demonstrate the different tools, and I keep thinking to myself… “why didn’t I do that???”. Anyway, great work and I look forward to reading more of your posts, and maybe even catching you at LEA 11 one of these days if you’re out and about.
Thank you, Becky! Lol I’m a constant fiddler. I have checked out the picmonkey blog for tips, but mostly I’ve learned by trying to recreate in picmonkey things I’ve seen done using other editing programs. I’m thrilled by the response I’ve gotten from these tutorials and so glad I’ve been able to share what I’ve learned 🙂
I think we need to have a mid-month party at LEA11…I missed the opening and don’t want to have to wait till the end! Maybe even an impromptu workout session to help fight Blogger Butt 😉