I’ve been amazed by how many hits and comments I have had on my Picmonkey tutorial from Strawberry Singh’s “Teach Me Something” Meme Challenge! I’ve decided to take it even further and take you through a step-by-step process on how I edit a photo using Picmonkey. Alas, I won’t be doing a slick video, but I’m going to add screen shots and explain the rather circuitous route I take when post-processing a photo. Please be aware Picmonkey has both free and paid elements. The Royale settings are marked by an orange crown. I am a Royale member, so I am including both. Cost to gain access to these features is US$4.99/month or US$33/year.
I’m going to break this up into two posts, since I’ve taken a LOT of screen shots and I don’t want you to get bored. Also, since I’m taking part in Avatar Blogger Month at irez.me, this tutorial will be two of my 30 posts in 30 days (clever, eh? 😉 )
Today I’ll be taking you through basic edits and touch ups…my way! So grab your drink and your snack, turn on your favourite music, and let’s begin!
1. Uploading your photo. Pop over to picmonkey.com and click on Edit a photo to open a window to select your picture. (You can click on any of the photos in my posts to see larger versions)

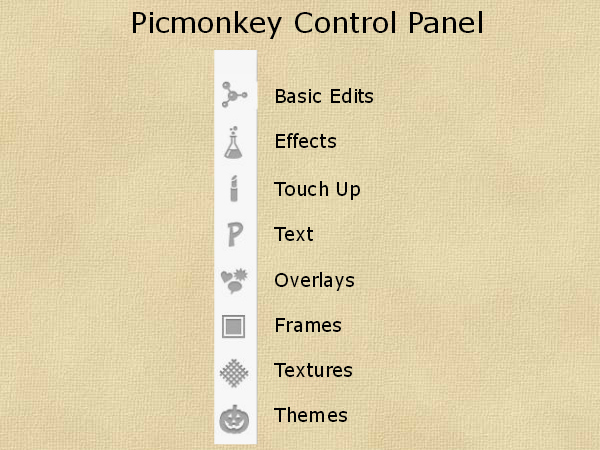
I’m going to throw in the photo of the tool bar for Picmonkey again. To see the name of the tool, just hover your mouse over the icons.
2. Basic Edits – Cropping – Standard setting. Cropping is always the first edit I make. I generally use 1024 X 768 (a 4:3 ratio) for my photos, but there are also a lot of pre-defined crops you can use by selecting from the drop-down menu. If you choose a crop that isn’t pre-defined, make sure you click the Scale photo box so your ratio stays the same.
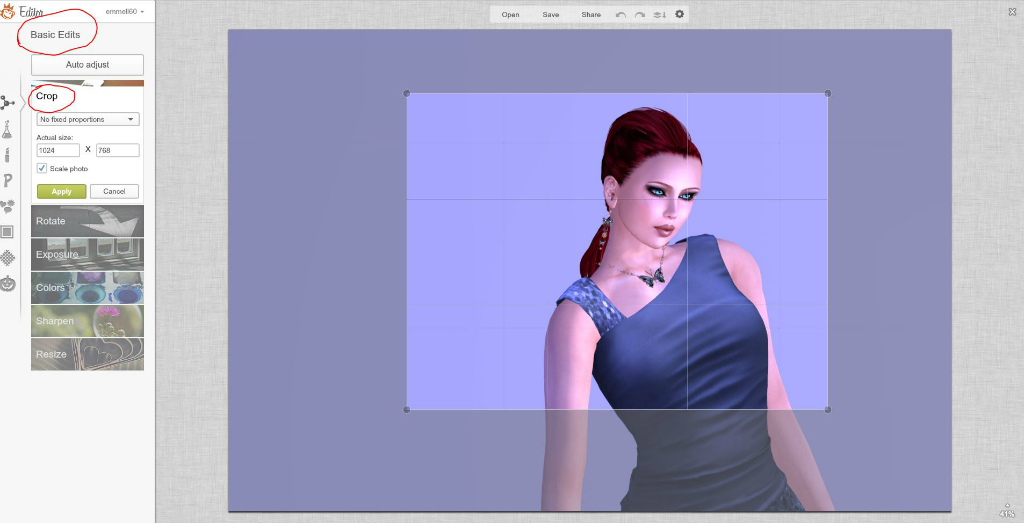
Once you’re happy with your crop, click Apply. If you decide you don’t like it, just hit the back arrow button at the top of your screen and start over.
3. Basic Edits – Exposure – Standard setting. This is the next edit I always make. I click on Auto adjust and see what picmonkey decides to do with the exposure levels. As you can see from this screen shot, it was pretty happy with the exposure, only adjusting the Shadows +1.

You can play with the sliders to your heart’s content, or just go with the auto adjustment. I have noticed that picmonkey likes brighter photos, so if you have a dark picture and want to keep it that way, you’ll probably have to drop down the amount of Highlights Picmonkey adds. Even if you don’t, you can adjust this through other methods later in the process.
That’s usually all I do in Basic Edits, but feel free to play around with the other settings.
On to Touch up!
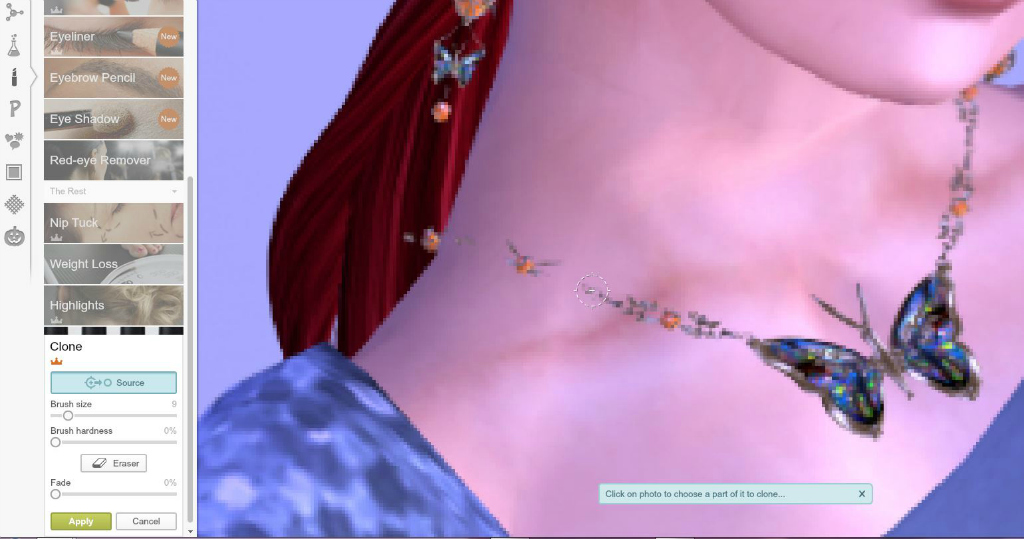
4. Touch up – Clone – Royale setting. If you take hi res photos in Second Life, you most likely have to contend with those annoying grid lines across your beautiful picture! If you’re shooting against a busy background, this might not be a problem. I, however, usually shoot portraits against a solid background (this one was actually white, by the way. The Windlight setting I chose gave it the cool blue tint). Gridlines on a solid background are fairly simple to remove, using the Clone tool. You’ll find it at the very bottom of the Touch up menu. It’s also available in the Effects menu, but since I go to Touch up first, this is where I normally access it.

You’ll need to adjust your brush size, depending on the area you are working with. Since I’ve got a lot of real estate on the background and it’s a fairly consistent hue, I can use a larger brush. Just make sure the Source button is blue, select an area of clean background that closely matches the area of the gridlines and click. That will select the area you will be duplicating and will show up on your photo as a green dashed circle. As soon as you do this, a solid white circle will appear over your selection. Simply move this over the area that needs to be corrected, and drag and click to cover up the lines. You’ll need to adjust your target area from time to time, since it moves with the selection you are correcting. Just click on Source again, choose a new area and keep covering up whatever needs to be fixed. You can use the back arrow at any time to go back if you make a mistake or need to change your target area and have gone too far.
Once you are happy with the cloning, click Apply.
5. Touch up – Nip Tuck – Royale setting. This is Picmonkey’s version of Liquify, found in Photoshop. I use this to round out those jagged edges and sharp bits that Second Life photos always have. In the photo I’ve chosen, the edges aren’t that bad, but I will still use Nip Tuck to clean it up.

There are three settings you can use in Nip Tuck – Melt (the water drop), Reduce (the scalpel) and Fill (the syringe). I rarely ever use anything besides Melt, but feel free to experiment.
You can see from the screen shot the areas I need to work on. Generally, I reduce the size of the brush, but leave the Strength at 50%. Again, play around with these settings for the best fit for you. Now, simply place the brush over the area that needs to be rounded and push and pull until you have the look you want. Unfortunately, there is no masque in Picmonkey, so you will need to be careful not to distort the parts of the photo around the areas you correct. This might be a good time to adjust the strength if you notice major distortion in the surrounding area.
I find it easier to use gentle nudges, rather than a sweeping motion with the brush, but if you have a steadier hand, you can try using longer strokes to nip and tuck those nasty bits into submission!
I’ve used Nip Tuck in this photo to soften the jawline, round out the sleeves of my dress, make the corner of my nose look less sharp and smooth out the curve of my arms.
6. Touch up – Clone – Royale effect. Yep, I’m heading back to Clone. While I was doing my nipping, I noticed that part of my necklace had disappeared. Grrrr. Rather than go back into Second Life and reshoot the photo, I’m going to use Clone to fix this. No, it won’t be perfect, but if you’re not zoomed in on the area, I think you’ll see it’s a pretty nifty fix.
Once I’ve zoomed in on the trouble spot, I open my Clone tool again and reduce the size of the brush. I select an area of the chain that is appropriate to fill in the missing part, then drag the selection brush upwards, filling in the missing chain below the orange bead that originally appeared to be embedded in my neck. Once I reached the bead, I needed to work on the part above it. I ran into a little problem there – there isn’t a part of the chain close to this gap, and when I tried using the same area I had originally used, I found the skin surrounding the chain was much lighter than the area I was trying to fix. But since there wasn’t really another area that had the right curve of the chain, I used the lighter-skinned area to fill in the missing part, then switched over to Eraser on the Clone screen, reduced my brush size even further, and deleted those pixels around the chain that were too pink. It’s a tedious process, and I didn’t manage to remove all of the lighter skin, but from a distance, it’s barely noticeable. I can live with that, hoping that nobody but me zooms in that close!
7. Touch up – Airbrush – Royale setting. Now I grab my Airbrush, just to smooth over those blotchy areas created by shadows and highlights.
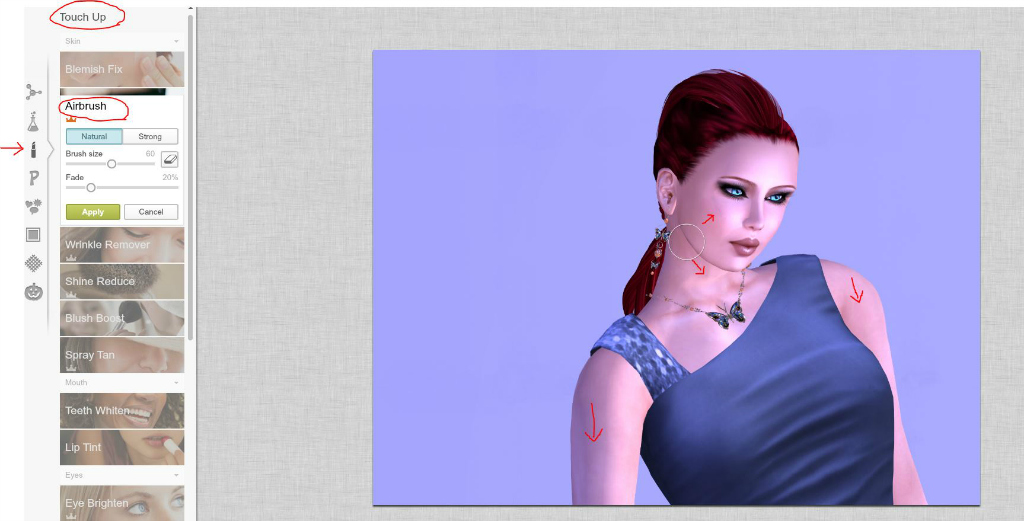
Adjust your brush size to whatever works for you, but a larger brush seems to give a more blended look (at least to my eye). I do avoid using the Airbrush in areas that have bright highlights and around the eyes. At least at this point 😉 I’ve noted the areas where I will airbrush – the arms, neck, and the cheeks, up to the cheekbone. Simply stroke the brush over the blotchy areas, and watch the subtle blending. If you go over an area that has bright highlights, you will probably notice a demarcation line. If this happens, just use your handy back arrow until it disappears, or the eraser to remove the parts you don’t want.
8. Touch up – Wrinkle Remover – Royale setting. I use this tool to blend the highlights and shadows that don’t work well with simple airbrushing.
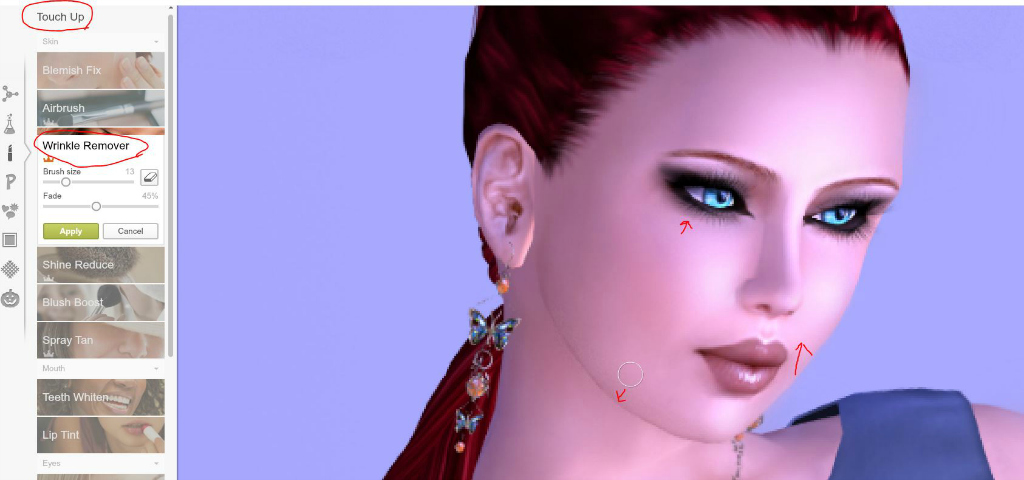
With this photo, I am going to reduce the brush size, increase the fade and work on that strong shadow around the jawline, the heavy highlight on the cheeks and smudge the shadow around the lower eyelid. Don’t get frustrated with this tool – it’s rather sensitive and it can take several adjustments to get the blend just right. You can use the Eraser to fix any minor boo-boos if you shade too far, or hit the beloved back arrow if you really screw up (like when your cat jumps on your keyboard and you smear your eyeliner across your nose!). I do caution you that if you use too heavy a hand with this tool, the area can look pixelated. Just keep practicing – it’s well worth the effort!
I usually go back to my Airbrush at this point. Sometimes I will use it to soften the blending from the Wrinkle Remover, but it’s not always necessary.
9. Touch up – Eye Brighten – Standard setting. I don’t often use this tool, but it’s nice if you want your eyes to really stand out.

I had a hard time capturing the brush in the right spot for my screen shot, so forgive me that it isn’t positioned directly over the iris in this shot 🙂 It’s really a simple tool to use. Adjust your brush size so that it just fits over your eye, and click. It doesn’t change the colour of your eyes – it simply brightens them.
And that’s it for part one! There are a lot of tools I haven’t covered here, but I’m taking you through my method. I may use other tools, particularly in Touch up, depending on the photo, but these are my go-to tricks.
I hope you haven’t nodded off on me and will stay tuned for Part 2, when I go through the fun part of Picmonkey – the effects! See you tomorrow!
I have completed a fourth tutorial using PicMonkey – this time it’s a video! You can click here to check it out.

Peep went to the plastic surgeon! I should have known. *head desk*
Shhhhhhhhhh!!! Sheesh, can’t tell you anything in confidence! :p